Die Cutting Machine Installation and Acceptance Guide: 3 Key Considerations for Buyers

Use-Foil-Stamping-to-Deter-Forgeries.

Die Cutting Machine Installation and Acceptance Guide: 3 Key Considerations for Buyers

Table of Contents
    Add a header to begin generating the table of contents

    Preface

    With over fifty years of experience in post-printing equipment, SBL Machinery has practical installation experience with thousands of die cutting machines worldwide. We have either directly installed them or assisted distributors in the process. Now, we will present, from the consumer’s perspective, what considerations should be taken during the actual installation phase after purchasing a die cutting machine. This will not only help ensure a good acceptance quality for the newly acquired machine and stable production in the future but also provide more knowledge in the field of die cutting machines. Without further ado, let’s dive into the content of this edition!

    1. Installation Space and Positioning of Machinery

    Some might wonder if discussing the preparation of sufficient machinery space within a factory is still necessary. Indeed, it is one of the crucial aspects to confirm before making a purchase. However, based on SBL Machinery‘s extensive experience in assisting clients with machinery equipment installation, there may still be oversights or misunderstandings among customers in this aspect. Besides ensuring an adequate physical space, considerations for machine operation, maintenance space, and an overview of all production equipment are vital aspects to pay attention to in this project.

    manufacturing

    1-1. Ensuring Adequate Installation Space

    • Equipment Size Assessment:
      Before selecting an installation site, carefully evaluate the dimensions of the die-cutting machine, including length, width, height, and potential expansion areas.
    • Safety Pathways:
      Reserve sufficient safety pathways to ensure operators can freely enter and perform necessary maintenance and repairs.

    1-2. Considering Operation and Maintenance Space for the Machine

    • Front and Rear Space:
      Provide enough front and rear space for operators to conveniently access various parts of the machine for adjustments, inspections, and maintenance. Also, consider the movement space for hand carts or track-conveyed paper during paper feeding.
    • Side Space:
      Ensure adequate space on the sides of the machine for maintenance personnel to perform necessary maintenance work.

    1-3. Avoiding Overcrowding

    • Adjacent Equipment:
      When the die-cutting machine is adjacent to other production equipment, ensure there is enough distance between them to prevent mutual interference.
    •  Safety Gaps:
      Consider the operation and vibration of adjacent machines and ensure sufficient safety gaps during installation.

    2. Exterior Inspection

    Firstly, our focus will be on the condition of the die-cutting machine‘s casing. By examining the surface of the casing, we can determine the presence of smoothness, scratches, scuffs, or damages. This not only affects the aesthetic appearance of the machine but is also directly related to the overall durability and lifespan of the machine. The inspection of relevant labels, markings, and the control panel are aspects that customers often overlook during the machine installation acceptance. If abnormalities are detected during the exterior inspection, immediate communication with the manufacturer is advised to facilitate subsequent part replacement or repair work.

    die cutter machine manufacturer

    2-1. Casing and Exterior Inspection

    • Machine Casing:
      Examine whether the surface of the machine casing is smooth and free from noticeable scratches, scuffs, or damages.
    • Paint Condition:
      Check the evenness of the machine’s paint and whether there is any peeling or oxidation.

    2-2. Labeling and Marking Inspection

    • Clarity of Markings:
      Confirm the content of all labels and markings, such as operational directions and the legibility of ruler numbers. Ensure that they adhere to equipment identification standards. This inspection is crucial for the smooth production and yield of the machine, ranking just below the exterior examination.
    • Warning Signs:
      Confirm the presence of necessary safety warning signs to alert operators to specific risks, ensuring safety in production.

    2-3. Control Panel Inspection

    sbl hmi
    • Buttons and Switches:
      Test all buttons and switches to ensure their responsiveness and normal operation.
    • HMI (Human-Machine Interface): Inspect the clarity of the HMI panel screen display, checking for abnormal flickering or error displays. Additionally, verify the operating interface language, ensuring it is changed to a language commonly used by the machine technicians. Speed adjustment in most cases is done through the HMI, and it is essential to confirm with the installing manufacturer how to adjust the die-cutting speed from the HMI. Interpretation of machine error codes and common troubleshooting methods for these codes should also be addressed.

    3. Operation and Performance Testing

    The preceding sections, involving the installation of mechanical space and positioning, as well as the exterior inspection items, are relatively static checks. Now, let’s delve into the dynamic aspects of accepting the die-cutting machine, including the running speed test, paper feeding test, and stability and safety tests.

    paper cutting machine

    3-1. Running Speed Test

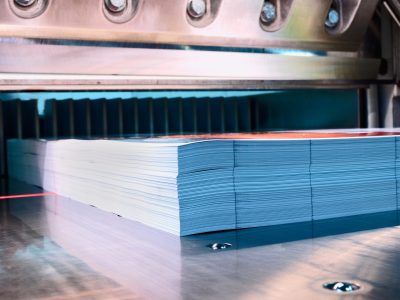
    Generally, the die-cutting speed of a machine can reach speeds ranging from 4000/sheets to 9000/sheets per hour. Only a few high-end manufacturers globally, such as SBL, Bobst, and Heidelberg, can achieve the 9000/sheets per hour mark. Of course, the running speed is also influenced by other factors, such as the thickness, material, and humidity of the paper. In practice, when operating the die-cutting machine at its maximum speed, certain specific conditions must be met. Therefore, not all types of paper can be cut at the highest speed.

    For this test, you can use the paper working materials provided by the machine’s original manufacturer or prepare sample papers for future production or die-cutting tests. While conducting the test, observe the performance of the speed to ensure it operates normally. Simultaneously, inspect the cut paper product for the completeness and uniformity of the blade marks.

    3-2. Paper Feeding Test

    How Does the Die Cut Design Process Work?

    The paper feeding section will adjust the size of the paper feeding-related modules based on the size and originality of different types of paper. Manufacturers like SBL Machinery can even independently adjust the angle and type of suction cups according to different sheet requirements, catering to a wider range of paper thicknesses. It is recommended to test paper feeding with the thickest and thinnest paper to learn how to adjust for different papers. This helps confirm that the upper and lower limits of paper can operate normally, usually presenting no significant issues within this range of papers.

    3-3. Stability Test

    The positioning and basic installation of the machine takes approximately two to three days. It takes three to five days for acceptance and education training to be completed. Of course, it will vary depending on the client’s professional technical capabilities and experience.. You may wonder how to test the stability of the machine during this short period. Typically, you can use the following methods to test the stability of the machine:

    • Product Yield
      Whether operating the die-cutting machine at high or low speed, product yield should be the primary consideration. If operating at high speed is limited by the size or thickness of the paper, adjustments to slower speeds need to be made. In such cases, it’s advisable to have the original equipment manufacturer’s technician provide guidance. This testing phase aims to determine the maximum speed at which the target working materials can run and enables customers to learn how to adjust the mechanical mechanisms and settings for optimal production yield and efficiency.
    • Observation of Machine Operation Sound and Vibration
      In theory, under normal operation, the machine should not produce any unusual sounds or vibrations. If there are abnormal sounds or vibrations, it is necessary to determine whether there are improperly installed parts or unexpected conditions during transportation that have led to the generation of unusual sounds or vibrations.

    3-4. Safety Test

    stop button

    The safety test of the die-cutting machine refers to a series of inspections conducted after the machine’s installation is completed. The goal is to ensure that the machine is safe and reliable during use, preventing accidents. Ensuring the safety of machine operators is the most crucial consideration, surpassing all other functions and performance aspects.

    • Safety Device Inspection
      Verify the positions of safety guards and emergency stop buttons to ensure they can be opened, closed, and moved normally.
    • Effectiveness Inspection of Safety Devices
      For instance, when the machine is in operation, the safety guard should only be openable in the closed position. If the safety guard or window is opened during machine operation, it should either enter a shutdown state or lock the machine. Testing if the emergency stop button can be pressed during operation and whether the machine immediately enters a stop state is also crucial.

    NEWSLETTER

    Scroll to Top